Showing posts with label patterns. Show all posts

Sunday, February 23, 2014

Free Class for Five Lucky Ladies!


Over the past few months, I have been hard at work on some new Sew L.A. patterns, and in order to test the latest design, I'm offering a FREE CLASS! The class is on two consecutive Saturdays - March 1st and 8th - from 2pm till 5pm. In order to enter the drawing, you must be able to attend both classes. And this drawing is open to all students who have taken one other beginner garment class: Cute Skirt, Easiest Skirt, Pajamarama, Tess' Dress, Lela Top - talk to the ladies at the shop if you have questions about your sewing level!

Here's the pattern:


And the description: six gores (or panels) make up the body of this flared skirt. The front features two pockets sewn into the seams and a 1”  wide flat waistband. Pockets are self lined, or you can pick a separate fabric for the lining - just for fun or if your skirt fabric is on the heavier side. The back has elastic in the waistband. The lower edge is finished with a double fold hem. Choose 18” long (View A) or 22” long (View B).

Interested? Call the shop at 323.665.7097 during business hours (11 - 6pm) on either Feb 24th, 25th or 26th (2014) to leave your name, contact info and waist & hip measurements. Based on your size, you will be entered into a category for X-Small, Small, Medium, Large and X-Large. We'll do a random drawing to select the winner for each size category and we will contact you by the end of the day on Feb 30th to confirm and give you the supply list. Students chosen will be responsible for bringing their Basic Sewing Kits and materials for making the skirt - instruction and your pattern are FREE!

Thursday, October 11, 2012

Decades of Style Tea Party!


1940's Girl Friday Blouse


Sew L.A. is thrilled to announce a Decades of Style Trunk Show and Tea Party! 

Join us on Saturday, November 3rd from 6pm till 9pm for the opening of our week long display of vintage amazingness! The show will be hanging at Sew L.A. for a week (through November 11th) , but only at the party will we be offering a 20% discount on ALL DECADES PATTERNS and the chance to win one of the three newest designs: the 1930's Beach Romper, the 1930's Leading Lady Gown, or the 1950's Object d'Art Dress. If you have never seen these GORGEOUS patterns made up before, now is your chance - they are breathtaking.

Janet, the talented owner of Decades of Style, will be joining us for our tea party, and we are requesting appropriate attire for the event - your best vintage outfit (handmade or not), hats & gloves too! Of course, all are welcome regardless of attire - we just like to have an excuse to dress up!

We'll have many types of teas and beverages, along with sweet and savory snacks - scones, finger sandwiches, cakes, tarts - yum! And just to whet your appetite even more, here are some pictures from our first ever Decades trunk show, back in 2008...


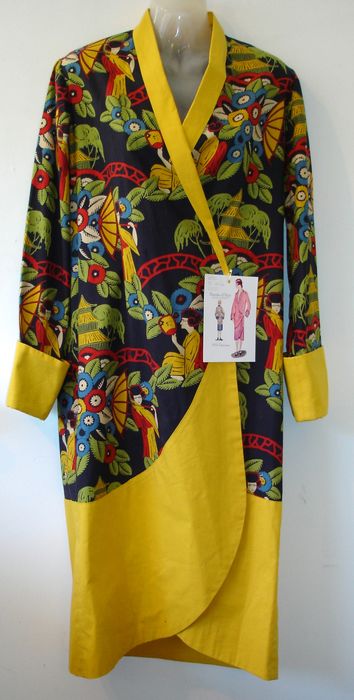
1920's Tulip Kimono

1944 House Dress

1930's Butterfly Blouse
1916 Sanger Skirt


1931 Matinee Blouse

1927 Cloud Cape, front
1927 Cloud Cape, back

And here's a picture of my favorite hat (NOT a Decades of Style pattern). We all look forward to seeing you at the party!


Saturday, March 10, 2012

Violet Blouse Sleeve Adaptation


Everyone knows how much we love the Violet Blouse pattern from Colette - such a comfortable but still put-together look! I myself have 4 of the short sleeve persuasion, so I thought it was about time to sew up the mid-length sleeve variation. 

The difference here is that I thought it would look GREAT with a band to finish the sleeve instead of elastic, and then I thought of doing a post to show you how! (This might have also been suggested by 3 or 4 Violet Blouse classes... in a row...) 


And of course I needed something to compliment my skirt made from 'Zebras & Giraffes':
So here we go! First, measure your arm just below the elbow. To that measurement, add up to 2" for ease - my measurement was 9 3/4" and I added enough extra to make 11 1/2". That measurement will be the length of your band.

Thursday, January 26, 2012

Introducing Devon Iott from Miss Make!


It's me, Christine! You might have noticed on our schedule that there’s a new teacher. I’ve known the lovely Devon Iott of Miss Make for many years now, and I’m thrilled that she and her adorable Square Knot Clutch are coming to Sew L.A.! Devon’s first class is on January 31 - it's already sold out - with another session coming up later in the spring on March 24. The clutch is adorable and only a second level beginner class, so many of our students are eligible to take it!


I thought it might be nice for you all to get to know Devon better, so I asked her a few questions about life, sewing, and celebrity crushes. Read on below and when you spot her in the shop, say hi and introduce yourself to her! Welcome Devon!


Tell us about yourself! Where are you from and when did you start sewing/crafting?

I grew up on a farm in rural Ohio. I've always loved making, baking, and creating. My mom had a sewing machine that I used to play around with, and my aunt was an uber-crafter and quilter. She always used to get me the coolest crafty birthday/Christmas presents that helped get me hooked when I was young. Now I can't stop!


What is your main craft now? Is it sewing, or are you busy with other creative ventures as well?

My main craft is sewing, but I also do a lot of knitting and crochet. I find that what I'm compelled to make is affected by the seasons – when autumn rolls around I'm suddenly all about yarn hoarding and crocheting, but when it's spring again I shift back to fabric and sewing. Beyond that - nothing is really off limits. My craft supplies closet is a terrifying bottomless pit filled with everything from acrylic paint to jewelry findings to mosaic tiles.


What is your favorite thing to sew?

Quilts! I get an immense satisfaction out of arranging and rearranging colors and patterns and seeing how they affect one another. It's almost like creating a painting or collage, but at the end it's something soft and snuggly that you can use. I like that, art in an everyday object.


What is your favorite tool when sewing?

My Gingher dressmakers shears. I feel like they should be stored on red velvet under a glass case. They are beautiful and divine.


What fabric do you love to work with and what do you dread sewing?

My favorite fabrics are modern quilting cottons with a little whimsy. Heather Ross is my favorite fabric designer. The part that I dread the most about sewing is cleaning up! I'm not very neat - I usually get excited about something then go on a sewing rampage without any thought to the mess I'm making - and then at the end there are always pieces of fabric and thread and lint everywhere.


Where do you gain inspiration from?

I'm the most inspired when I see an unexpected juxtaposition of colors that somehow works. Sometimes I'll be organizing fabric and carry a piece into a different room and suddenly it looks different because of the new environment it's in. I love that! I'm also inspired by the endless stream of other crafters' projects on the internet. We are very lucky to be able to visually share what we make so easily.


Have any favorite projects or recent successes to share?

I'm excited to have built up my website to have pretty regular traffic with around 1,000 hits a day. A few months ago someone in Zambia emailed me to tell me that she had made my Spiked Lavender Lemonade for her and her boyfriend to enjoy while they watched the Zambian sunset. That made me sooo happy, that someone on the other side of the planet had looked at my blog and made one of my recipes. To me that's what it's all about.


I see on your blog that you're also quite a cook! Tell us more about that!


I love being in the kitchen! Baking is very therapeutic to me. It's a calming process that allows my mind to wander in a relaxing way. I also love food, so that helps. My most popular food post by far is my Blue Moon cupcakes recipe. The idea just hit me one day, and I thought YES! That needs to happen. Now. And apparently other people agree.


What are your future plans for your line of Miss Make Sewing Patterns?

I'd love to add some more designs to the mix (I have a few in the works) and try to get them into a few more stores in the area and across the country.


Your class project, the Square Knot Clutch, is adorable and a great project for beginners! How did you come up with it?

Thanks! It was in a desperate response to a bout of craft-starvation while I was at my parent’s house last year. I hadn't made anything in DAYS [how terrible] so I went to the closest fabric store for supplies and just started playing around. I'd had the rough idea for a clutch in my head for a while and I just wanted to see if it would work. It did! When I got back to LA I tweaked it a little and worked out the pattern.


Okay, quick fire round:

Celebrity Crush: Paul McCartney, forever.

Guilty Pleasure: Country music [can't help it]
Favorite Food: Any kind of flaky, buttery breakfast pastry
Dream Vacation Spot: Getting lost in the UK
Favorite Color: Peachy salmon pink, or mustard yellow
Best Celebrity Sighting: Reese Witherspoon AND Jake Gyllenhaal together when I was working alone in a store in Malibu. She bought a pair of socks!

Thanks Devon! And welcome to our Sew L.A. family!

Wednesday, January 11, 2012

Schoolhouse Tunic Makeover!


We all love the Schoolhouse Tunic from Sew Liberated. It's pretty easy to sew, it lends itself to many different types of fabric, Sew Liberated was one of the first indie pattern companies, and it's EASY TO ALTER! This tutorial is great if you have already taken our Schoolhouse Tunic class or if you are sewing at the intermediate level.


I personally need a little bit of shaping at the waist, even if it's a garment that I want to pull on over my head. So I added waist darts to my first try... and quickly realized that I wanted to close up the front so I didn't have to wear a camisole all the time.

Here's an EASY method for closing up the front of your Schoolhouse - you can add waist darts or not - if you do, make sure it still goes over your head easily by sewing a muslin first from your altered bodice pattern!

You'll need a pencil, your clear ruler and your pattern - just cut around the front bodice pieces and the placket to separate them, don't cut your size out yet. If you are working from a pattern that has already been cut, you may need to add a bit of tissue to the bottom edge if you are adding a waist dart.

Friday, November 18, 2011

Colette's Macaron Dress and a Quick Skirt Change


Dress post! I finished my Macaron dress just in time for my friend Jimm's wedding. As usual, I was handsewing practically in the car on the way to the ceremony... this seems to happen at every formal event I ever go to. I have had my eye on this dress ever since it was released by Colette - especially after seeing all the cute versions of it being made all over the country - and when Christine decided to do it as a class I thought I'd try it out.


The pattern features a top contrast yoke and a really cool sweetheart illusion neckline. It has little cap sleeves and a bit of a bubble skirt with pleats with secret pockets. The bubble part was the only thing I changed as I really don't need that shape on my body. It looks great on a lot of peeps though! I chose fancy fabrics since this is a more formal dress - Nani Iro's 'Fuccra Rakuen' in peach and a silk/cotton blend in espresso for the contrast:


Monday, November 7, 2011

Oh I love a NEW COAT!


Hooray for fall! And of course fall means that we all have to drop what we are doing and make coats. I was looking at several coat patterns when I started my "Fall Wardrobe" series, and I ended up making muslins for two of them. I can't seem to stop looking at coat patterns, however, and someday I am going to make a coat like this, from Japanese designer Atelier Boz:


Since I need a coat right now, though, this is not the coat I will be making. So, I whipped out my trusty pattern books and came up with two patterns to test as muslins.

The first one is this coat, from the Daily Sewing book:


It's a relaxed cover-all type of jacket, unlined, with a hood and patch pockets. One of our canvases or twills would look fantastic - either a solid or one of the prints, sophisticated like Nani Iro's Painting Muji or fun like Echino's London! Sometimes it's nice to dream of all the jackets you could make...


Tuesday, October 25, 2011

Japanese Pattern Books


Since it seems like most of the patterns I make these days are from Japanese pattern books, I thought I'd do a little post about some basics for using these great resources! Many of you have heard me proclaim in class how stylish and well-designed these patterns tend to be, and with a little patternmaking skill you - yes, you! - can partake in the wonderfulness. I'd recommend starting with a very simple pattern, possibly similar to a pattern you have already sewn - the trick here is that all the sewing instructions are in Japanese. The pictures are fantastic for the most part, though, so any seamster intermediate and up can generally figure out what's going on. A reference book like the "Reader's Digest Complete Guide to Sewing" is also a great thing to have when you start winging it a bit! Overall, the fit is certainly curvier than one would expect, with bust darts and curved side seams - and it is also pretty roomy. For my own body shape - slim shoulders but a larger bust - the fit at the shoulder and sleeve parts of the pattern is unsurpassed.

Monday, October 11, 2010

DECADES OF STYLE Trunk Show Party!

Thanks to everyone who attended, we hope you enjoyed it as much as we did!


We especially would like to thank everyone who drove from quite far away (by L.A. standards), the Project Runway designers who stopped in, new & old friends, students, longtime & brand new customers... You all made it our best opening party yet!

Now it's time to get working on those lovely patterns, and we look forward to seeing your wonderful new 'vintage' garments next time!

Saturday Oct. 16th, 6pm - 9pm - FREE!


Join us for our annual trunk show opening party!

Once a year, the lovely Janet from Decades of Style Pattern Company sends us BOXES and BOXES of her lovely vintage reproduction patterns made up in GORGEOUS fabrics for us to oooh and aaah over.

Decades of Style 1930's Butterfly Blouse


They will be hanging artistically all over the shop from the 16th till the 24th of October, but only at our party will the patterns be 20% off so it's worth it to stop in!

We'll have drinks and nibbles, and of course we encourage you to dress up in your vintage finery, and I heard a rumor that there may even be some patterns to give away...

Monday, August 9, 2010

Pattern of the Month - August 2010

Hello all! Boy, that was one busy July. We had some Kids Camps and then there was the Renegade Craft Fair - which was awesome - and of course all our classes and people who wanted to buy some fabric. August is shaping up to be a bit more mellow, so we'll get a little R & R before September hits. And since Sew Liberated just released a brand new pattern - the Sunday Picnic Blouse - we can be cute, comfortable and stylish while relaxing!


Monday, May 24, 2010

Spring 2010 Quilt Market

Quilt Market is the largest trade show for people who own sewing, fabric and/or quilting shops in the US of A. It happens twice a year - Fall Market is in Houston and Spring Market travels around - this year it was in Minneapolis!


Monday, May 3, 2010

Pattern of the Month - May 2010

I love this bag! I made it for the Pattern of the Month and was going to put it on display at the shop, but it seems that I have kidnapped it and it's now my everyday bag. I can't tell you how much stuff I can cram in it - and that for me is a good bag. I even decided to make it into a kit to make it easier for everyone to get online (and we have them at the shop too)!


Friday, April 16, 2010

Adding to an Existing Dart

Part Deux of our Full Bust Adjustment festival, this tutorial will show you how to increase the size of an existing dart. I'll be using our Party Dress pattern (Kwik Sew #3521) as an example.

Most commercial patterns draft for a B cup, so many people have to alter up or down accordingly. On some patterns, you can fudge it a bit, or just get by - this is one of those patterns for me. It has always been a bit snug in the bust - but workable - now it's noticeably tight. My weight goes up and down a lot, and of course it all settles in the bust which means I have to alter almost everything I own. Hooray! Plenty of practice... Here's a picture where you can see that the existing dress squishes the bust a bit:


So, we'll be using the same slash-and-spread technique as we used previously in the Full Bust Adjustment aka FBA post along with the same supply list and cup size measurement chart. It might be a good idea to read through that post to refresh your memory - you can refer to it for all the step-by-step pictures I'll talk about below.

Here we go!

Wednesday, April 7, 2010

Full Bust Adjustment, aka FBA

Welcome to the second part of our Bust Adjustment extravaganza, a companion to the 3/22 Petite Bust Adjustment (sometimes called an SBA) where we featured the lovely Parfait Dress by Colette Patterns. Most commercial pattern companies out there draft for a B cup, so if you are not a B cup you'll need to make some changes in the pattern for it to fit your body better. This is really the essence of making your own clothes - you can be technically proficient but if things don't fit right it's not going to look good!

There are a couple of things you can do to make the bust area fit better - you can add a dart where there isn't one, you can increase an existing dart, or you can add more fabric to the gathers, tucks or pleats that shape the fabric like a dart. I'll be going through the steps to add a dart in this tutorial and follow up shortly with the other two methods. For the third method - gathers, pleats or tucks - I'll use the Parfait Dress again cause it's so pretty!

We'll start out using the same method for figuring out your cup size as we did previously - remember that your cup size for a pattern might be different from your bra cup size. First, measure around the fullest part of your bust:


Then measure your high bust - under the arms and over the bust across the ribcage:


The difference is what makes your cup size:

  • 1" or less: A cup
  • around 2": B cup
  • around 3": C cup
  • around 4": D cup
  • around 5": DD cup
  • etcetera!

I wear a DD bra but make a pattern adjustment for a D cup because I have a 4" difference.

We'll need the same patternmaking supplies:

  • Extra paper - pattern paper or copy/printer paper
  • a sharp pencil - a mechanical pencil is best
  • 2 x 18" clear ruler
  • clear tape - the matte kind you can write on
  • push-pin type thumbtacks
  • a vary form curve or hip curve ruler

Thursday, April 1, 2010

Pattern of the Month - April 2010

There are so many great sewing patterns out there that we here at Sew L.A. have decided to highlight one pattern a month right here in our blog so everyone can share in the fun! We'll talk about why we picked the pattern, show you some pictures and talk about anything we did differently from the instructions, plus share any helpful hints we might have regarding fitting and construction.

We just got a bunch of incredible rayon prints in at the shop from the Van Gogh collection by Free Spirit, and I was itching to make something out of it. I was looking for something quick and easy as I had a dreaded tax deadline hanging over my head, and this is what I came up with - our first Pattern of the Month - KWIK Sew 3242
This is one of those patterns where you can't see how great a design it is till you make it in fabric that you like! I was thinking breezy and easy, because it was hot here for about two minutes last week, so I made View B, the shorter skirt. It's definitely a beginner level pattern: two pattern pieces, a couple of seams and an elastic waist. The hem is easy - there's just a lot of it - so that's the only thing that took a little time. The pattern says to overcast the edge then turn it in for a hem, but I did a double fold hem because you can see the hem as you wear the skirt. First, I made it in one of our solid bamboo rayons because I love the color - 'moss':


Now I'm making it in this fabric!


I love that it looks like a bias cut skirt but it's really cut on the straight of grain. If you have taken Pajamarama, the Wrap Skirt or the Tess' Dress class, you can make this no problem! Use more pins when pinning because rayon is slipperier than cotton (this would look fine in cotton as well, but it wouldn't be as slinky looking).

Sizing is something you'll need to pay attention to. Here's a picture of the finished measurement where the skirt meets the yoke:


You'll want the skirt measurement to be at least 1" larger than your body measurement. If you'll wear the waist of the skirt right at your natural waist, this measurement will fall an inch or so under your hip bones, so you can measure around there. I like to wear this with the waist more AT my hip bones (I have a lot of tunic length tops) so I used my hip measurement at 9" from my natural waist to choose the size. My measurement is 41", so I chose the large which will give me one inch of ease. If you are unsure, erring on the side of a little more room is always a good policy. Pattern bonus: a cute cap-sleeve tee shirt! Super easy and quick if you have already worked with knits a bit (like in our Basic Tee class). Enjoy!

Monday, March 22, 2010

A or B Cup Alterations for Colette's Parfait Dress

Hello all! Shaerie here, with the first in a series of posts designed to take some of the mystery out of fitting your body correctly when using commercial patterns. We teach a class here at Sew L.A. using Colette's awesome Parfait Dress pattern, which is drafted for ladies with a C cup. Most commercial patterns are drafted for B cup ladies, so while this is a boon for some of us it ends up looking too baggy in the bust for many petite ladies.

The technique illustrated herein is sometimes called a small bust adjustment and can be used on almost any pattern. You can also use this technique to remove a bust dart on any pattern that has one, like our Best Party Dress (Kwik Sew #3521) or our 1950's Dress (McCall's #4769). This tutorial may look long, but it really doesn't take a long time to do. We just have so many pictures! Shortly, I'll be posting the opposite technique - a large bust adjustment or how to add or enlarge a dart if needed.

How do I know what my cup size is? you may ask yourself. Don't listen to what those ladies at Victoria's Secret tell you! They are helping you find a bra that fits, not a pattern size. For pattern sizes you need two measurements: the fullest part of the bust and also what is called your high bust measurement - this goes under your armpits and over your bust. The difference between the two is what determines your cup size.

1" or less: A cup
around 2": B cup
around 3": C cup
around 4": D cup
around 5": DD cup
etcetera!

Supplies needed:
Extra paper - pattern paper or copy/printer paper
a sharp pencil - a mechanical pencil is best
2 x 18" clear ruler
clear tape - the matte kind you can write on
push-pin type thumbtacks
a small Vary form curve or french curve ruler


The Parfait Dress pattern has only two inches of ease at the bust - we can tell that by comparing the bust measurement on the size chart with the finished garment bust measurement on the back of the pattern. We measured the bust and came up with 35", so we started with the pattern size 4. On this specific pattern, check the waist measurement as well - there is only 1/2" of ease per size!

1. Choose size by full bust measurement
2. Cut out pieces A and C: bodice front and midriff front
3. Draw in 5/8" seam allowance on the bottom of A and the top of C